Remote Debugging with PyCharm

I’m working in a project now, that requires a certain (server) environment to run, hence it is developed on my local machine and then gets deployed on remote server. I thought I’m gonna say bye bye to my favorite PyCharm feature, namely the debugger, but to my surprise remote debugging has been supported for years now. It took some time to figure out (tutorials online are a bit ambiguous), so here is a short report on my findings.

For the sake of this tutorial let’s assume the following:

  • Remote host: foo_host.io
  • Remote user: foo_usr (/home/foo_usr/)
  • Local user: bar_usr (/home/bar_usr/)
  • Path to the project on the local machine: /home/bar_usr/proj

Here goes the step-by-step how-to:

  1. First we need to set up remote deploy, if you haven’t done so already. Go to Tools → Deployment → Configuration. And set up access to your remote server via SSH. I’d use:
    • Type: SFTP
    • SFTP host: foo_host.io (don’t forget to test the connection before applying)
    • Port: 22 (obvously)
    • Root path: /home/foo_usr
    • User name: foo_usr
    • Auth type: Key pair (OpenSSH or PyTTY)
    • Private key file: /home/bar_usr/.ssh/id_rsa (you’d need to generate the key and ssh-copy-id it to the remote machine, which is outside of the scope of this tutorial).
  2. Go to Mappings tab and add Deployment path on server (pehaps, the name of your project)
  3. Now under Tools → Deployment you have an option to deploy your code to remote server. These first three steps could be replaced with simple Git repository on the side of the server, however I sometimes prefer this way.
  4. Now when you have the deployment set up you can go Tools → Deployment → Upload to ..., note however, that it deploys only the file you have opened or the directory you selected in the project view, so if you need to sync the whole project just select your project root.
  5. I use virtualenv, so at this step I need to ssh into the remote machine and set up virtualenv in your project directory (/home/foo_usr/test/.env), which is outside of the scope of this tutorial. If you’re planning on using the global Pyhton interpreter, just skip this step.
  6. Now let’s go File → Settings → Project ... → Project Interpreter. Using gear button select Add Remote. The following dialog window would let you set up a remote interpreter over SSH (including remote .env), Vagrant or using deployment configuration you have set up previously. For the sake of this tutorial I’m going to put something like that there (using SSH of course):
    • Host: foo_host.io
    • Port: 22 (which is there by default)
    • User name: foo_usr
    • Auth type: Key pair (OpenSSH or PyTTY)
    • Private key file: /home/bar_usr/.ssh/id_rsa
    • Python interpreter path: /home/foo_usr/proj/.env/bin/python
  7. If you set up everything correctly, it should list all the packages installed in your remote environment (if any) and select this interpreter for your project.
  8. Now let’s do the last, but the most important step: configure debugging. Go to Edit Configurations… menu and set things up accordingly. For our hypothetical project I will use the following:
    • Script: proj/run.py (or something along these lines)
    • Python interpreter: just select the remote interpreter you have set up earlier.
    • Working directory: /home/bar_usr/proj/ (note that this is working directory on local machine)
    • Path mapping: create a mapping along the lines of /home/bar_usr/proj = /home/foo_usr/proj (although this seems pretty easy, it may get tricky sometimes, when you forget about mappings and move the projects around, be careful).
That’s it. Now we should have a more or less working configuration that you could use both for debugging and running your project. Don’t forget to update/redeploy your project before running as the versions may get async and PyCharm would get all whiny about missing files.

My Take on Yandex Pre-interview Python Assignment

I’ve applied for a junior Python position at Russian internet giant Yandex (very similar to Google). And although my application has been rejected, due to lack of experience, I think their little pre-interview test and my take on that may be of interest to any inquisitive pythonista. Note, that this has never been properly translated into English before, so this is probably exclusive in that regard.

Assignment I

There are two lists of different length. The first one contains keys, the second – values. Write a function, that would create a dict out of these lists. If the key doesn’t have a value – it should equal None, if the value doesn’t have a key, it should be omitted.

def get_dict(list1, list2):
    ret = dict(map(None, list1, list2))
    if ret.get(None, False):
        ret.__delitem__(None)
    return ret

Assignment II

Login should start with latin symbol, contain latin symbols, digits, dots and hyphens, but end only with a latin symbol or a digit. Minimum length is 1 symbol, maximum – 20 symbols. Write a function that checks strings for correspondence with these rules. Think of several methods of solving this problem and compare them.

import re
import time

def check1(login):
    ret = False
    if re.match('^[a-zA-Z][a-zA-Z0-9\-\.]{0,19}(?<![\-\.])$', login):
        ret = True
    return ret

def check2(login):
    ret = False
    if (len(login) >= 1 or len(login) <= 20) and login[0].isalpha() and (login[-1].isalpha() or login[-1].isdigit()):
        for a in login[1:-1]:
            if a.isalpha() or a.isdigit() or a == '-' or a == '.':
                ret = True
    return ret

def compare(login):
    tm = time.time()
    check1(login)
    print(time.time() - tm)
    tm = time.time()
    check2(login)
    print(time.time() - tm)

Assignment III

There are two tables users and messages (I changed names and messages to non-Cyrillic):

users
UID name
1 John Doe
2 Natalie Knaph
3 Johnatan Yozo
messages
UID msg
1 Hello, John!
3 Send me the card, quickly.
3 I’m waiting on the corner of 5th and Lafayette
1 This is me again. Please message me more often.

Create a SQL query, that would return two fields: “User name” and “Total amount of messages”.

SELECT users.name AS "User name",count(*) AS "Total amount of messages" 
FROM users 
JOIN messages ON users.uid = messages.uid 
GROUP BY users.uid

Assignment IV

Suppose you have a generic access.log. How to get 10 most frequent IP-addresses using standard terminal tools? How to do that with Python?

# BASH:
grep -o '[0-9]\{1,3\}\.[0-9]\{1,3\}\.[0-9]\{1,3\}\.[0-9]\{1,3\}' access.log | sort -n | uniq -c | sort -n -r | head -10

# PYTHON:
import sys
import re

all = re.findall("[0-9]{1,3}\.[0-9]{1,3}\.[0-9]{1,3}\.[0-9]{1,3}", open(sys.argv[1], 'r').read())
srt = sorted(all, key=all.count, reverse=True)
unq = []
for m in srt:
    if not m in unq:
        unq.append(m)
print unq[0:10]

If you can think of a better way to solve any of these, let me know.

Humble Collection of i3wm Lifehacks: Part I

Lifehack 1: Locking the Screen

This is kinda a nobrainer, but me myself sometimes look for a place, where to copy some of the syntax (I’m lazy and don’t always keep that in my head), so let’s start with this one. i3wm ships with beautiful and robust screen locker i3lock, which can be launched like that:

i3lock -c 000000

It will lock the screen with black overlay. The problem is, that you wouldn’t be typing this command every time you want to lock the screen. We need to add a shortcut to i3 config file:

bindsym $mod+Shift+Tab exec "i3lock -c 000000"

Now when we press the combination of mod-button (Win in my case) and Shift+Tab – our screen gets locked.

Lifehack 2: Activating/Disactivating the Second Screen

If you use i3wm on daily basis, you probably know, that the second screen is not turned on automatically. You should manage displays manually with xrandr command. If we run this command without attributes, we’re gonna get something like this:

Screen 0: minimum 320 x 200, current 3200 x 1080, maximum 8192 x 8192
LVDS1 connected 1280x800+1920+0 (normal left inverted right x axis y axis) 261mm x 163mm
   1280x800      60.02*+  50.05  
   1024x768      60.00  
   800x600       60.32    56.25  
   640x480       59.94  
VGA1 connected 1920x1080+0+0 (normal left inverted right x axis y axis) 521mm x 293mm
   1920x1080     60.00*+
   1680x1050     59.95  
   1280x1024     75.02    60.02  
   1440x900      59.89  
   1280x960      60.00  
   1280x720      59.97  
   1024x768      75.08    70.07    60.00  
   832x624       74.55  
   800x600       72.19    75.00    60.32    56.25  
   640x480       75.00    72.81    66.67    60.00  
   720x400       70.08  
HDMI1 disconnected (normal left inverted right x axis y axis)
DP1 disconnected (normal left inverted right x axis y axis)

On some rare occasion writing something like this would not be a problem:

xrandr --output VGA1 --right-of LVDS1 --auto

Well, I know you’re probably well aware of how xrandr works. Just in case.

It may get pretty redundant if you use second screen on daily basis and regularly unplug it from your laptop. The best way to go would be to add script shortcut to your /usr/bin/ or /bin/ directory. Run the following lines:

printf '#!/bin/bash\n\nxrandr --output VGA1 --right-of LVDS1 --auto' > /usr/bin/screenswitch
chmod 755 /usr/bin/screenswitch

We can use screenswitch command which doesn’t make it much easier. What would certainly help us is a key shortcut, so let’s add a line similar to one in the previous hack to our i3 configuration:

bindsym XF86Display exec "screenswitch"

Now when you press on your special key combo (Fn+F7 on my ThinkPad), you enable/disable the second screen. Try some other key combination if you have no special display button. Of course the script itself is pretty basic and it would work only if your screen works well in auto and you use the same second screen daily. However, there are more complex scripts available all over the web (example).

Lifehack 3: Locking the Screen on Wake

If you use pm-utils with your i3wm setup, you’ve probably noticed that the screen is not locked, when the laptop is awakened after suspend or hibernate. It’s very insecure. Let’s try to fix it. Create file cat /etc/pm/sleep.d/91blocker and add the following lines to it:

#!/bin/sh
case "$1" in
        thaw|resume)
                su youruser -c '/usr/bin/i3lock -c 000000'
                ;;
        *) exit $NA
                ;;
esac

Don’t forget to change youruser to your username. Now let’s make sure we have all the right permissions:

chmod 755 /etc/pm/sleep.d/91blocker

Now, if we run pm-suspend or pm-hibernate our screen is going to be locked on wake. This script has one shortcoming though: it doesn’t lock the screen instantly, so you may see stuff for a couple of seconds before it gets locked. If it is not a critical issue to you, feel free to use it, othrewise you may need to work on it or find a different solution altogether. If you have any ideas how to improve it, let me know.

Short History of my Relationship with Lenovo ThinkPad

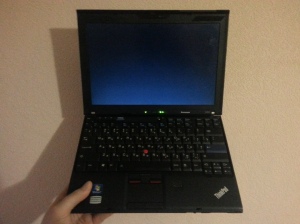
My own ThinkPad X201.
My own ThinkPad X201 workhorse
For those, who have limited time, this post comes down to the following statement: Lenovo Thinkpad X201 is the best X-series Thinkpad created yet (although after a somewhat heated discussion at Reddit, x220 looks better). What follows is my attempt at proving this point with my merely anecdotal evidence. I’m funny like that. Here comes a short story of my relationship with Lenovo Thinkpad X series.

In 2013 I’ve been working as a technical writer (more technical than a writer actually) in a medium-sized web-slash-mobile startup and the Macbook, they’d given me, failed and I decided to try something new. At that time I got increasingly interested in Lenovo Thinkpad (yeah, it hadn’t been IBM for quite a long time already). A couple of my colleagues had these X220 machines and they seemed pretty solid and professional, especially with all kinds of Linux installed on them (I worked with a bunch of Python devs and everybody used their favorite flavor of Linux). My transition from Macbook to Thinkpad was also dictated by how Macbook wouldn’t let me use i3wm (which I was completely sold on at the time) as the main WM. So I went to my manager an he approved my order. The problem was I wasn’t really familiar with modern ThinkPads then and ordered 14″ model (thought I could use all the extra screen space). I figured any Thinkpad will do. It was my mistake.

I got T431S, which was admittedly quite expensive at the time, but didn’t look like Thinkpad at all. If anything it resembled plastic version of Macbook. It had a rather disguising chiclet (island-type) keyboard, no LED indicators, thinner body and as a result much less ports (although for the record I do understand S stands for slim). The only thing it had in common with the previous generations of Thinkpads was the clit, which was kinda useless without the additional row of buttons, the device actually had no touchpad buttons at all as it mimicked the Macbook-style platform touchpad (awful, awful trend, actually). The hardware was of questionable quality and it gave me lots of headache on Linux (especially WiFi) despite the ThinkPads traditionally being considered one of the best laptops, when it comes to compatibility with Linux. I worked on this machine until the company went under, and got used to it somehow, but it never lived up to the image of Thinkpad I had in my head.

Even after that I didn’t give up on the Thinkpad series completely, though it clearly went downhill with every subsequent model. My wife got herself X230 at work and as I got to play with the device a bit, I had an impression that this is not as bad as 431S, so as the line moved forward I decided to go in the opposite direction. At that time I started working in a medium enterprise infosec company and they had Thinkpads all over the place, and most of these were the Thinkpads as I expected them to be from the day one. These were X201 models. They aren’t as outdated as the earlier ones but they have all the right features. Here is a short comparison between some of the latest X series models:

X201 X220 X230 X240
LED Indicators 9 on the front and 3 are mirrored on the back. 3 on the front and 2 on the back. 2 on the front and 2 on the back. None (!)
Keyboard Classic Classic Chiclet Chiclet
Ports VGA, Ethernet, 3 USB, separate ports for mic and headphones, phone line port, ECSC slot. VGA, Mini DisplayPort, 3 USB (1 USB 3.0), combo audio jack, media card reader slot, ECSC slot. VGA, Mini DisplayPort, 3 USB (2 USB 3.0), combo audio jack, media card reader slot, ECSC slot. VGA, Mini DisplayPort, 2 USB 3.0, combo audio jack, media card reader slot, ECSC slot.
ThinkLight (Keyboard Flashlight) Yes Yes Yes The keyboard is backlit instead. Get your tongue out of Apple’s ass, Lenovo!
Clit Buttons Yes Yes Yes Touchpad is a platform with areas for clit buttons, which is kinda sad.*

* – to be fair Thinkpad X250 actually went back to having hardware buttons, so X240 is not the whole new tendency, but rather disappointing stumble.

So, to sum it up for X201:

  • There is the right number of LED indicators (X220 and X230 have less and X240 seem to have none whatsoever) and they are mirrored on the back of the machine, which is convenient, when the lid is closed.
  • The classic Thinkpad keyboard is just right for coding. No trendy chiclet bullshit.
  • Ports and slots is the area, where the age of the machine shows the most. It doesn’t have any USB 3.0 ports and Mini DisplayPort would be actually nice. Still, it’s much better than X240.
  • There are two rows of buttons, one for clit mode and the other for the touchpad. Although I work with clit most of the time, I find having an additional bottom row rather convenient, yet I’d probably go with no touchpad at all.
  • Flashlight!
  • The only problem with X201 model for me is that it’s not available for sale officially anymore (at least where I live), I even tried to buy out my office X201, when leaving the company but they wouldn’t let me. So I found a place that sold used ThinkPads for a reasonable price and bought one from there. This machine is pure magic, and it doesn’t matter that it’s a bit outdated. It has i3 CPU (which is still fair these days), up to 8GB RAM (which is usually enough), extended 6 cell battery makes up for its age (easily gives me 5 or 4 hours of relaxed coding) and overall design hints at the times when the word Thinkpad meant something more than “an ugly plastic Macbook knockoff”. Without much exaggeration I can say, that in 12.5″ X line of ThinkPads (at least to me) the X201 model seems greatly superior to anything made before (due to being relatively modern) or after. It’s still relevant today and has the potential of being developer’s muse (fetishist talking) and workhorse.

    An update is due: although I still think X201 is one of the best ThinkPad X-series machines, after a heated Reddit discussion X220 seems to be an even better model with all the advantages of X201 (except the amount of LEDs 😉 ), plus newer hardware and better screen. You probably should consider that machine if you are shopping for classic ThinkPads.